Tuesday, April 24, 2012

Handiham World for 25 April 2012

Welcome to Handiham World.
drawing of transceiver
You can do it!  

Today, just as we did last week,  we are going to begin with Troubleshooting 101 as part of our initiative to help new ham radio operators (and even some of us older ones) learn how to do some basic troubleshooting for ourselves. Yes, it can be tempting to ask someone else to do things for us.  This can become a bad habit when it keeps us from learning new things, especially things that we could - with a bit of practice - learn to do for ourselves.  Knowing these basic things can serve us well in the future when no help is available.  This next simple exercise is one that we will be practicing at this summer's Radio Camp.  You can do it yourself once you learn a few basics.

Troubleshooting 101
Cartoon guy with toolkit
I have set up my Echolink audio and it worked perfectly, but today when I tried using Echolink, the audio was really low or not working at all.  What can be done?

Echolink audio tab in System Setup  Reach system setup with keyboard command ALT-E.

Before we say anything more about this, I have to let you know that you are not alone.  I like Echolink and use it nearly every day, but I still consider it to be a journey, so to speak.  I have not quite arrived yet at the point where Echolink works perfectly each and every time.  Audio problems are common and expected, so we have to learn how to troubleshoot them.
Your first test should be a visit to the Echolink Test Server.  Find the test server by going to the Station menu (Arrow right from the File menu or use ALT-S) and when you hit "Station", arrow down to "Connect to test server". You should hear the familiar welcome message.  After the welcome, get focus in the transmit box, toggle transmit with the space bar, and transmit a short test message. Toggle again and wait for your audio to be echoed back to you. If there is no audio, proceed to the "No Audio" troubleshooting.  If there is low audio or too much audio so as to cause distortion, proceed to the "Audio Level" troubleshooting.

No Audio

If there is no audio at all, there are several things to check.  
Volume:  Is the volume turned up?  Are your computer speakers powered up?
Microphone: Is the microphone plugged in?  If there is an external microphone, whether USB or the 3.5 mm plug, it may have been unplugged by another user in the family, or you may have unplugged it and forgotten to plug it back in. Some microphones have their own mute buttons.  Check to make sure the microphone is not muted. If you are using a microphone headset with 3.5 mm audio plugs, make sure that the headphone plug and the microphone plugs are not reversed. If you use a USB headset, plug it into the same USB port on your computer each time so that the machine does not search for USB drivers each time you plug it in. 

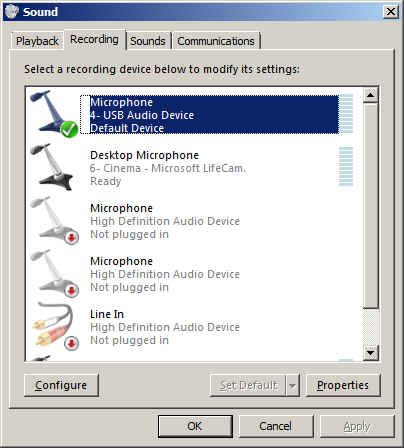
Audio Mixer: The audio mixer in your operating system (usually Windows for Echolink users) might have the microphone either muted or the wrong audio input is selected. Windows users need to go to the Windows Mixer recording settings.  Getting there is different depending on your version of Windows.  We will not explore this, but it is something you should learn about your own computer and operating system. In the recording mixer settings, unmute the microphone and run the slider up if it is set at zero. Repeat the test server test and it should work fine.  You can usually get to the mixer settings via the Echolink application itself. Go to the Tools menu, then arrow down to "Adjust sound device" and choose "Recording".  This is an easy way to find the recording mixer!

Multiple audio inputs: As we mentioned, the wrong input may be selected in your Windows mixer.  Be sure the correct input for the microphone you want to use is selected as the default device.  Again, how you do this may vary depending on your operating system.  You should learn how to use your operating system's mixer.  

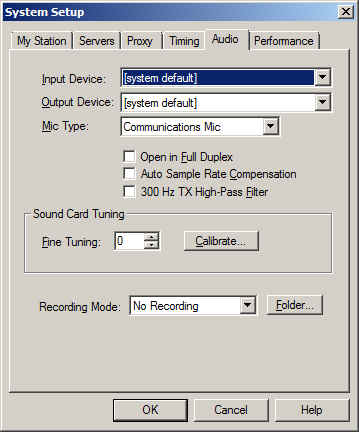
Echolink sound selection:  The Echolink application has its own selection of audio input devices available from a pull down menu.  You will find it on the audio tab in System Setup.  The choices are "Input Device" and "Output Device". If the microphone selection is to be checked, the one you want to pull down is the "Input Device".  If you have more than one input device, they should all be listed in the pull down.  However, the first item listed is always "system default".  That is the one you should select, because if you followed the directions we just gave you, you have already set the preferred microphone to "default device".

Recording device list in Windows 7 with default device selected.

So why do we recommend using "default device" instead of one of the other selections?  It is because selecting the recording device via the Echolink pull down does not always result in the correct device actually being used for audio input.  This is a real mine field for users who have lots of audio devices.  A computer could have a TV tuner, more than one microphone, a webcam with a built-in microphone, a line in device, and even a USB audio line to a transceiver.  Don't laugh - I have had all of these things, and sometimes Echolink reported one microphone being the input when instead the audio was coming from the HF rig connected via USB.  It is safer to set your preferred microphone up as the default device in Windows, then always choose the default device as the Echolink input via the Setup menu.
Final test: If you have followed the directions and everything is set up as described, repeat the test server test.  Adjust levels if necessary.  If there is still no audio, you may have to look further.  There could be a fault in your microphone, usually with the cable or plug, or with the computer hardware or sound card drivers. 

Low Audio

Microphone selection and positioning: As we already discussed, you must be sure that you are using the correct device. One fellow I know was puzzled by a low transmit audio condition.  When I talked with him on Echolink, his audio sounded like he was far away from the microphone, yet he was wearing a headset microphone combo.  The diagnosis was that the sound was being picked up by his laptop's built in microphone, which had been selected as the default audio input device.   If you are simply too far away from the microphone it can have exactly the same effect. Position the microphone closer to your mouth, keeping it slightly to the side.  If the mic element must be very close to your lips, as is the case with headset microphones, use a foam wind screen to prevent puffs from making loud noises as you speak.

Beware of other software that takes over mixer settings:  Voice dictation software can change your mixer settings to some predetermined level that is ideal for speech input computing.  You may have your Echolink levels just perfect, then you open Dragon NaturallySpeaking®, enjoy a session of typing with your voice, and think nothing of it.  But the next time you want to use Echolink, the microphone audio may be very low.  This happened to me all the time, because I liked using my USB headset for both voice dictation and Echolink. Dragon would reset the mixer every time, unchecking the microphone AGC boost and changing the slider level. It might be best to select different input devices for these two software applications so one does not fight it out with the other for mixer level settings. 

Mixer settings continued: Most of us will not use anything but the built-in software mixer, but there may be some users who use external hardware mixers.  These can be great for those who like to really be in control of their audio.  If you have an external mixer, be sure the microphone is plugged in and selected as the input device. Check the sliders to adjust the level.  If the device uses external power, be sure it is powered up! 

Every computer system is different.  It is difficult for someone else to help you with your system, especially on the phone.  So I have some "homework" for you.  I want you to learn how to use the audio mixer in your own computer, and learn it well enough to set input and output levels.  Some computers (probably most these days) have some kind of keystroke combination or actual dedicated keys on the keyboard to raise and lower the volume or mute the audio.  Some laptops have a volume control that operates by spinning a wheel or holding down a specific key. You need to learn these controls and learn them well, because they will be used for lots of other applications like taking voice notes, doing voice dictation, playing music, listening to audio books or Internet audio streams, and much more.  Wouldn't it be nice to learn the mixer settings so that you don't have to ask for help on these things as well as with Echolink?  

Sure, it would!  And you can do it.  

Email me at handiham@couragecenter.org with your questions & comments.  
Patrick Tice, WA0TDA
Handiham Manager

Wednesday, April 18, 2012

Handiham World for 18 April 2012

Welcome to Handiham World.
drawing of transceiver
You can do it!  
Today, just as we did last week,  we are going to begin with Troubleshooting 101 as part of our initiative to help new ham radio operators (and even some of us older ones) learn how to do some basic troubleshooting for ourselves. Yes, it can be tempting to ask someone else to do things for us.  This can become a bad habit when it keeps us from learning new things, especially things that we could - with a bit of practice - learn to do for ourselves.  Knowing these basic things can serve us well in the future when no help is available.  This next simple exercise is one that we will be practicing at this summer's Radio Camp.  You can do it yourself once you learn a few basics.
Troubleshooting 101
Cartoon guy with toolkit
Help! My HF radio is dead!
One of the things we grow used to is turning on the radio and hearing stations, even if they happen to be weak or off frequency.  We quickly learn, as new operators, how to tune around and adjust the VFO to hear stations clearly.  Sometimes we turn the radio on first thing in the morning and hear nothing but static from far-off  thunderstorms, but that is nothing new.  We know that we can tune across the band and find some really strong stations.  
But this morning is different.  You turn the transceiver on, but there is nothing - no sound at all, at least any that is loud enough to detect without headphones.  What could be wrong?
transceiver with braille book
Well, the best thing to do is to follow the advice in "The Hitchhiker's Guide to the Galaxy" and don't panic.  Many of our Handiham members are blind, so we will include some troubleshooting steps for them.  We are going to check off everything without making assumptions.  Some of our readers will think that this stuff is obvious, but in the grand scheme of things we must allow for a wide range in the knowledge and experience of amateur radio operators.  Some will be familiar with the "dead radio" problem and others will be experiencing it for the first time.  Let's cover all the bases.
  1. Yes, I know this is obvious, but did the radio really turn on when you flipped the switch?  Did the radio make a telltale sound when switched on?  Even if I could not see the lighted display of my IC-7200, when it is powered up I hear a click as a relay energizes in the connected autotuner and my computer makes a connected sound to tell me that a USB device is now on line.  Keying the PTT in SSB mode and not talking should trip the transmit relay without sending any RF, so you can hear the click of the relay.   Have you checked the power supply switch?
  2. Make sure that you have not left headphones plugged into the PHONES jack. Doing so on most radios will mute the speaker. 
  3. Check the AF gain (volume) control.  Maybe you turned it all the way down the last time you used the radio.  Don't laugh - I often do this if I am in the radio room and get a phone call or start listening to something else.  Turn up the volume and if you can hear stations, you have solved the problem.
  4. Check the RF gain control.  Sometimes this gets turned down by accident, or perhaps you turned it down in a previous session because you were dealing with a very strong signal.  Turn it back up and try tuning around again.  Incidentally, I often find that users of the Handiham remote base stations leave the RF gain turned down on the TS-480 radios.  No wonder the bands seem dead!
  5. Okay, so now we have power to the radio, the RF and AF gains are adjusted, and there is still no sound.  Many radios have squelch controls, and this little feature can cause all but the very strongest signals to be completely muted.  Perversely, this control is sometimes a concentric one that shares the same spot as the volume control.  It is easy to misadjust, by which I mean setting it to anything but completely off!  With the volume turned up to mid-range turn the squelch all the way down.  Note that you don't want the volume cranked up to max when you do this, as the sound may be startlingly loud!
  6. Don't forget the other adjustments your radio may have to tailor the sound.  Filter settings and pass band tuning might be set incorrectly.  If they have detents, return them to "normal".  
  7. Still nothing at all?  Retrace your steps to make sure there is power to the radio.  Check the power supply and connection to the radio. Check the fuses and breakers at the station equipment and at your home's breaker box. Make sure everything is connected as usual. 
  8. Assuming that you do actually have power and that the radio is powered on, you could have a problem with the radio itself.  Sometimes oxidation occurs on the mechanical connection in the headphone jack.  Push a headphone plug in and out to clear it.  Don't forget to listen via the headphones to eliminate the unlikely possibility that the speaker coil has opened.  If any of  this resolves the condition, you are good to go.  If not, take further steps to have the radio checked.  Ask for help from your local radio club before assuming that the radio has failed. There are probably club members who are experienced with that radio and who can help you determine what is wrong and whether it needs service.
  9. Let's say that you do actually hear a gentle hiss from the radio but that you can't tune in any stations.  Check to see if you have locked the main tuning dial by mistake.  If the tuning is locked, you can twirl the dial all day long and the frequency will not change! 
  10. Now you have tuned across the band and there are no signals.  Try another band and check again.  Still nothing?  Check to make sure that the antenna's feedline is connected.  If you have an antenna switch, make sure that it is in the correct position.  Don't forget the radio's antenna selector if your transceiver has one!
  11. Try WWV on 5 and 10 MHz.  Both put out awesomely strong signals. If you hear a weak or warbling signal, conditions may be poor. 
  12. Next, tune your radio to a local commercial AM radio frequency.  You may not be used to doing this, so be aware that to direct enter such a frequency you may need to key in something like zero dot eight three via the direct entry on your keypad to get "830" on the AM radio dial as I do here for local station WCCO.  Of course you will choose your own local station if you don't live here in the Twin Cities. If you can hear a local AM station it is likely that the radio is fine and that HF sky wave band conditions are just extremely poor.  By tuning the local commercial AM station, you can hear a ground wave signal that does not depend on sky wave propagation. 
  13. If the local commercial station comes in fine, try checking the SWR on your antenna system.  If that passes muster, it is likely that your station is intact and functioning normally and that HF band conditions are just really, really poor following a solar event.  If the SWR is terrible, perhaps the feedline or antenna have failed.  That is a separate troubleshooting issue.  
  14. If the HF conditions are indeed so bad that you cannot hear sky wave stations, you can confirm this by checking various solar weather and propagation websites. It is generally a matter of waiting a few days for conditions to return to normal.  When I was a young lad and had only recently gotten my General license, I ran into just this situation. I even went out side to check to see if my antenna was still up in the air!  It was the first time I had experienced what amounted to a radio blackout of sky wave propagation caused by a solar event.  Today we can confirm our suspicions about solar weather via the Internet, but back then it was a very puzzling thing.  Eventually I did learn more about solar weather and HF propagation so that the next solar storm did not catch me by surprise and make me think my antenna had fallen down!
Email me at handiham@couragecenter.org with your questions & comments.  
Patrick Tice
Handiham Manager

Wednesday, April 11, 2012

Handiham World for 11 April 2012

Welcome to Handiham World.
drawing of transceiver
You can do it!  
Today we are going to begin with Troubleshooting 101 as part of our initiative to help new ham radio operators (and even some of us older ones) learn how to do some basic troubleshooting for ourselves. Yes, it can be tempting to ask someone else to do things for us.  This can become a bad habit when it keeps us from learning new things, especially things that we could - with a bit of practice - learn to do for ourselves.  Knowing these basic things can serve us well in the future when no help is available.  This next simple exercise is one that we will be practicing at this summer's Radio Camp.  You can do it yourself once you learn a few basics.
Troubleshooting 101
Cartoon guy with toolkit
Checking continuity
There is no doubt in my mind that having a simple way of checking continuity is one of the troubleshooting basics.  Continuity, as we talk about it here, means that a path supporting electrical current flow exists between two or more conductors. That is not to say that a current is actually flowing - it just means that if and when we want a current to flow, it can do so.  
Let's take the example of a piece of coaxial cable.  At Handiham headquarters we have lots of long and short coaxial cables.  Some are jumper cables that are typically used to connect radios with accessories, such as a transceiver to antenna tuner or SWR meter, or maybe both with a couple of short coaxial jumpers.  Then there are the longer runs of coaxial cable that carry the signal out through the wall to a lightning arrestor and then to the antenna, depending on the installation. The proper operation of the station depends on conductivity between the radio and the accessories and antenna. Each link in the chain represents a possible failure point. 
If I pull a coaxial cable jumper out of the junk box at Handiham headquarters, I always take a moment to check it out for continuity.  Knowing that donated coaxial jumper cables have come in from a wide variety of sources, I know better than to trust that they will be good!  There are two steps to checking a cable.  The first is to see if the center conductor is soldered into the center pin on each connector.  Then unscrew the outer part of the PL-259 plug so that you can see if the coax braid has been properly soldered.  If the coax braid is not properly soldered, loose strands may be poking out of the solder holes or the solder may be lumpy and not properly flowed into the holes and onto the body of the connector. It's usually pretty easy to tell if there is a problem connector if the PL-259 plug moves freely when you twist it while holding onto the cable itself.  A loose plug means that you should set that jumper aside for repair.  
The second test is for continuity.  Even if a coaxial jumper looks perfect and the PL-259 connectors are solid, the cable may still be bad.  The possible conditions that may be revealed by your continuity test are these five:
  1. The cable is good and ready for use.
  2. The cable is open through the outer shield.
  3. The cable is open through the center conductor.
  4. The center conductor is shorted to the shield.
  5. An intermittent condition exists that causes a short or open when the cable is flexed. 
Digital multimeter, coaxial jumper to be tested, and clip lead.
Photo:  Simple test gear for a continuity check includes a clip lead and a multimeter with a continuity buzzer. 
Your test gear is pretty basic.  You need a simple continuity checker, which could light a lamp or sound a tone when the connection is made.  Some multimeters have a continuity setting that sounds a tone, but you can also just use the resistance setting.  While resistance is not the same as continuity, the idea is to test for extremely low resistance, which indicates that there is a connection between conductors.  If you have a multimeter with a continuity setting, use that.  If your meter only has a selection of resistance ranges, just start with R times 100.  Touch the meter probes together to either hear the continuity tone or watch the meter reading.  If you are watching the meter display it should indicate very low or no resistance when the probes are touched together. 
The other thing you need is a clip lead with alligator clips on each end.  Depending on your dexterity and the length of the cable to be checked, this little clip lead can prove very handy indeed.
Now we are ready to do the testing.  Be sure you are working only with completely disconnected coax.  Both ends must be free. 
  1. Take one end of the disconnected coax.  Remember, we are NOT able to test continuity with the coax connected to any equipment or antennas. Touch one multimeter lead to the center pin of the PL-259 plug and the other to the outer metal part of the plug.  You should hear nothing, indicating that the cable is not shorted.  This is always the first test, because we must eliminate the possibility of shorts before we can make any assumptions about the center conductors or the shield.  
  2. Next, take the clip lead and use it to short the coax at one end by connecting the center pin of one of the PL-259 connectors (it doesn't matter which one) to the shield side of that same connector.  Take the free end of the coax and touch one multimeter probe to the center pin and the other to the metal shield of that PL-259.  You should now hear the buzzer that indicates continuity.  
  3. You have now completed the basic tests, because you have determined that the cable is not shorted and by passing a current through the entire length of the center conductor and back through the shield, you have determined that both the center conductor and shield are intact.  The final test is to flex the cable and wiggle the connectors while performing both of these tests again.  If it helps, you can add two additional clip leads to connect  the multimeter probes so that you don't have to try to hold them in contact with the PL connectors. This will help determine if the cable is intermittent.
  4. If the cable fails any of the tests, feel free to test the shield to shield and center pin to center pin connections separately.  Never use a cable that is suspect, because it could cause damage to your equipment.  
  5. Last but not to be missed is a final check along the length of the cable for any obvious bad spots, such as a break in the outer jacket or any suspicious bends or bumps in the cable.  
If you are testing a long length of coax that goes through a wall, you will still need access to both free ends with the connectors.  In this case, you are going to have to do some legwork, so if you are starting outdoors, clip the clip lead onto the PL-259, shorting the center pin to the shield.  Go back indoors with the multimeter and check across the inside PL-259, where you should get the sound of the continuity buzzer.  Grab the multimeter and head back outdoors, then remove the outdoor clip lead and take a reading across the PL-259, center pin to shield.  There should be no continuity.  This is about the easiest way to check a long feedline. 
Email me at handiham@couragecenter.org with your questions & comments.  
Patrick Tice
Handiham Manager

Tuesday, April 03, 2012

Handiham World for 04 April 2012

Welcome to Handiham World.

drawing of transceiver
Goodbye, cassettes.
Unhappy frowning Pat with cardboard box of assorted tape cassettes.
The old way of doing audio:  Unhappy Pat poses with box of assorted tape cassettes.  Each one holds only a portion of an audio book.

Smiling Pat holds up a single Library of Congress digital cartridge.  The small green cartridge is not quite as large as a single 4-track cassette tape.
The new way:  Smiling Pat holds up a single Library of Congress digital cartridge.  Each new digital cartridge holds thousands of DAISY book pages or many hundreds of audio files. 

Well, don't say you didn't know this was coming.  Learning Ally and the Library of Congress have both made the switch to digital audio.  Bookshare has been digital for a long time already. Now it is time to announce the final stage in the life cycle of the Handiham tape cassette service, one of the few remaining analog special format services that is still active.  
Over the last decade digital audio has steadily overtaken analog tape cassettes in commercial applications.  The old cassette format is no longer supported as it once was in boom boxes, portable players, and automobile audio systems. The tapes themselves are harder to find and many households no longer even have equipment to play cassettes.  Anticipating the need for a digital system to replace this old technology that was also used by people who could not read regular print, the DAISY Consortium has developed the DAISY format book system that can couple audio files read by humans to specific sections and subsections of books.  DAISY can also generate computer speech from computer text of a book, then arrange it all on a DAISY book that includes spoken word audio and all of the text, complete with headings for sections and subsections. Now that the Library of Congress has completed its distribution of the new DAISY-capable digital players to replace the aging 4-track tape cassette players, we feel confident that Handiham members, even those without computers, will still have access to the new digital cartridges.
Make no mistake; the digital audio is far better than the old cassette tape audio.  If you are still using tape cassettes, now is the time to check out that new digital player.  With the new player you can navigate using audio prompts and find the exact thing in a book that you want.  You could never do that with tapes.  In the bad old days of taped instruction manuals, it was nearly impossible to find that part about setting the memories on your new radio! With the new digital system, that is an easy task.  In the old days, your audio had to come by postal mail.  Today you can download it via the Internet and put it on your digital player with a small adapter cable. Even Handiham members without computers can still receive their new digital cartridges in the mail, in special mailers similar to the old Library of Congress tape mailers.  The new system is designed to seem familiar to tape users, so that they can more easily learn it and make the transition.
The digital cartridges themselves are just a bit smaller than the old tape cassettes.  They have a hole in one end to facilitate grasping the correct end of the cartridge, even by a person with some mobility limitations.  The other end of the cartridge has a small USB connector that plugs into the digital player.  It slips into the new player only one way, and the experience feels much like putting a cassette tape into the old player. The USB plug is protected by extensions of the plastic cartridge to protect it from damage. This format also keeps it from plugging directly into a standard computer's USB ports.  That is why blind users who receive their audio from Library of Congress digital downloads must use an adapter cable between their computers and their digital cartridges.  We can also use such a cable to put Handiham digital audio onto the new cartridges. 
There is a cost difference between a tape cassette and the new digital cartridge.  Tape cassettes usually ran under a dollar, and because they are falling out of use they are available virtually free from people who are simply getting rid of old technology.  The new digital NLS cartridges are around $10 to $12 each, but remember that each one holds the equivalent of hundreds and hundreds of tapes.  And because the new digital cartridge has a different form factor than a tape cassette, it requires a new specialized NLS mailer.  These run about $2.50 each.  
The way the Handiham monthly digest audio program will operate takes into account the cost of these two items.  In the old system, we bought tapes and mailers and sent them to our members.  The members were responsible for returning the tapes and mailers when they had listened to the audio.  The return rate was never 100%, so some tapes and mailers were lost to attrition each month.  
In the new system, we will ask our members who want to have digital audio mailed to them by free matter postal mail to purchase their own digital cartridge and mailer, mark them with their callsign or identification, and send them to us for processing each month.  We will fill the cartridge and return it.  That way each individual has a vested interest in their own cartridge and mailer.  This will make the program easier to manage because we won't have to maintain a supply of our own cartridges and mailers.  It also spreads the cost among those users who don't have computers or Internet services.  It has really become labor-intensive to support a smaller and smaller number of Handiham members who use the old tape cassette technology.  As our tape duplicators get older, they are more likely to make recording errors.  It has gotten to the point where tapes are sometimes custom-produced for a single member who needs something like one of our license courses but who has no computer.  So serving that single member can get quite expensive, while hundreds of other members simply download their audio from our website with no staff assistance.  The digital cartridge provides a means of still serving that single member with good quality audio, even if they do not have a computer.  
So what is the plan?
We will continue to support tape cassettes through the end of 2012, but not for new members, beginning immediately.  All new members will be told about the new digital cartridge plan.  They will have a choice of either simply downloading the digital audio they need from our website or providing their own digital cartridge and mailer.  Members who are currently using the old tape system will be notified of the new cartridge plan and they will be given some options about where to purchase the cartridges and mailers.  Members who get their audio via the website will not be affected.
For Handiham World, I'm...
Patrick Tice, handiham@couragecenter.org
Handiham Manager